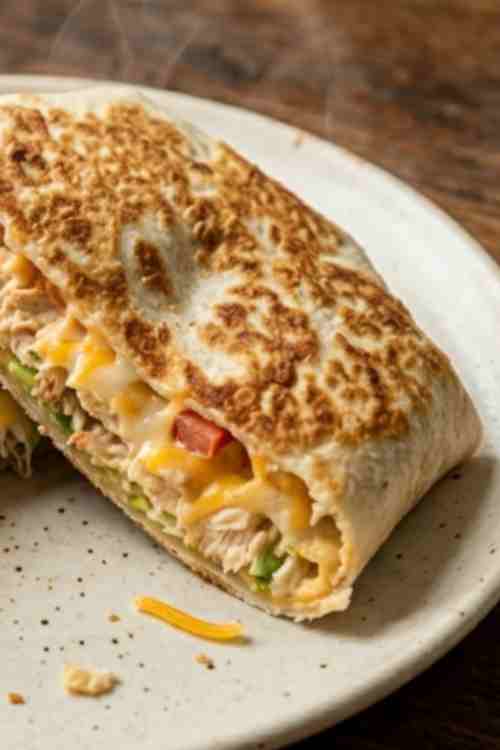
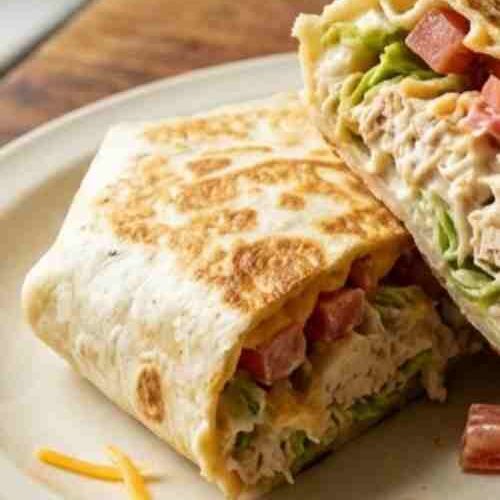
A chicken crunch wrap is one of those meals that feels fun, crispy, and very satisfying in every bite. It has a golden crunchy outside and a soft, creamy, cheesy filling inside. The mix of textures is what makes it so popular and loved by many.
This homemade version is simple and uses easy ingredients found in most kitchens. It is perfect for a quick lunch, easy dinner, or even meal prep for busy days. You do not need fancy tools or special cooking skills to make it. Just a pan, fresh ingredients, and a few simple steps.
Why You Will Love This Chicken Crunch Wrap Recipe
This crispy chicken crunch wrap is a favorite because it brings together everything you want in one meal.
- Crispy golden tortilla outside with a soft filling inside
- Creamy, cheesy, and flavorful chicken mixture
- Quick and simple to prepare at home
- Uses basic pantry and fridge ingredients
- Tastes like restaurant style fast food but fresher
- Easy to customize for different flavors
This is one of the best easy chicken wrap recipes when you want something filling, crunchy, and comforting.
Ingredients for Chicken Crunch Wrap
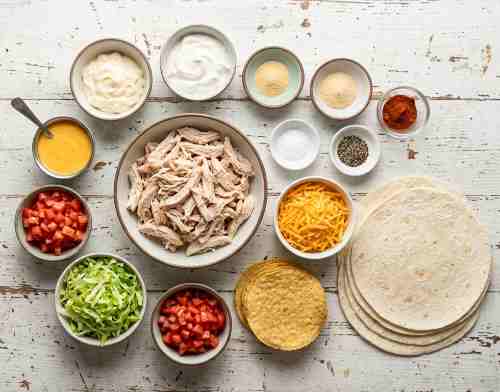
- 2 cups cooked chicken breast, shredded
- 1/2 cup mayonnaise
- 1/4 cup sour cream
- 1 teaspoon garlic powder
- 1 teaspoon onion powder
- 1/2 teaspoon paprika
- Salt to taste
- Black pepper to taste
- 1 cup shredded cheddar cheese
- 4 large flour tortillas
- 4 tostada shells or crispy tortilla rounds
- 1 cup shredded lettuce
- 1/2 cup diced tomatoes
- 1/2 cup nacho cheese sauce or melted cheese
- 1 tablespoon butter or oil for pan cooking
Ingredient Notes and Substitutions
- Rotisserie chicken can be used instead of freshly cooked chicken for faster prep
- Greek yogurt can replace sour cream for a lighter texture
- Mozzarella cheese can be used instead of cheddar for a milder flavor
- Add jalapeños or chili flakes for a spicy crunch wrap
- Whole wheat tortillas can be used for a slightly healthier version
- You can skip nacho cheese sauce and use only shredded cheese if preferred
Step-by-Step Instructions for Chicken Crunch Wrap
Step 1: Prepare the Creamy Chicken Filling
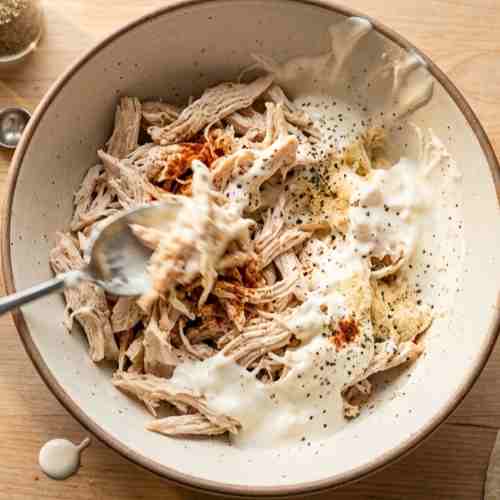
Take a large mixing bowl and add shredded cooked chicken. Add mayonnaise, sour cream, garlic powder, onion powder, paprika, salt, and black pepper. Mix everything thoroughly until the chicken is evenly coated and creamy.
Make sure the chicken is well mixed so every bite has flavor. The texture should be creamy but not watery. If it feels too thick, add a small spoon of sour cream to loosen it slightly.
Step 2: Warm the Tortillas for Flexibility
Place the flour tortillas in a dry pan for a few seconds on each side or warm them in the microwave for 10 to 15 seconds. This step makes the tortillas soft and easier to fold without breaking.
Do not overheat them, or they may become dry and crack when folding.
Step 3: Build the Crunch Wrap Base Layer
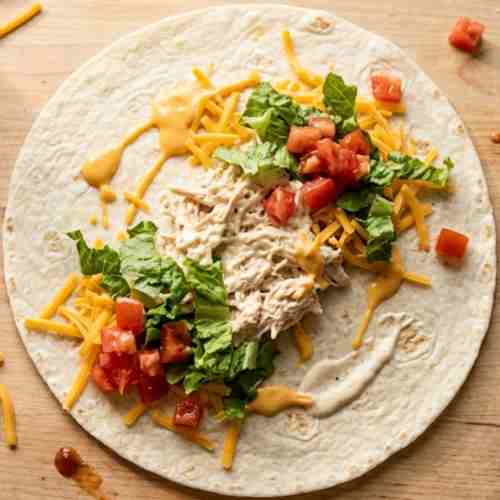
Lay one warm tortilla flat on a clean surface. Place a generous scoop of the creamy chicken mixture in the center. Spread it slightly but keep space around the edges for folding.
Add shredded cheddar cheese over the chicken so it melts nicely later. Next, add shredded lettuce for freshness and diced tomatoes for a juicy bite. Drizzle nacho cheese sauce or melted cheese over the filling for extra richness.
Keep the filling in the center only. This helps the wrap close properly later.
Step 4: Add the Crunch Layer

Place one tostada shell or crispy tortilla round directly on top of the layered filling. This is the key step that gives the chicken crunch wrap its signature crunch texture.
Press it gently so it sits flat. The tostada layer should be centered so it supports the structure of the wrap evenly.
Step 5: Fold the Wrap into a Tight Seal
Slowly fold the edges of the tortilla toward the center over the tostada shell. Work around in a circular motion, folding one section at a time until the wrap is fully closed.
If needed, slightly overlap the folds so the wrap stays sealed. The top should look like a sealed, layered pouch.
If the tortilla does not fully close, you can place a small extra piece of tortilla on top to seal it.
Step 6: Cook Until Crispy and Golden
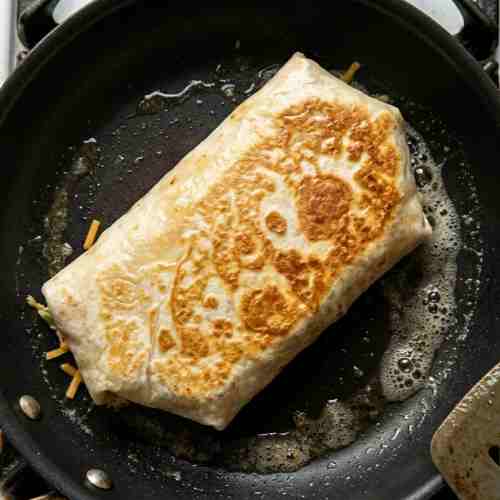
Heat a non-stick pan over medium heat and add butter or a small amount of oil. Place the wrap seam side down first so it seals properly.
Cook for 2 to 3 minutes on each side. Press gently with a spatula so the tortilla crisps evenly. The outside should turn golden brown with crispy texture while the inside becomes warm and melted.
Do not use high heat, or the outside may burn before the inside warms up.
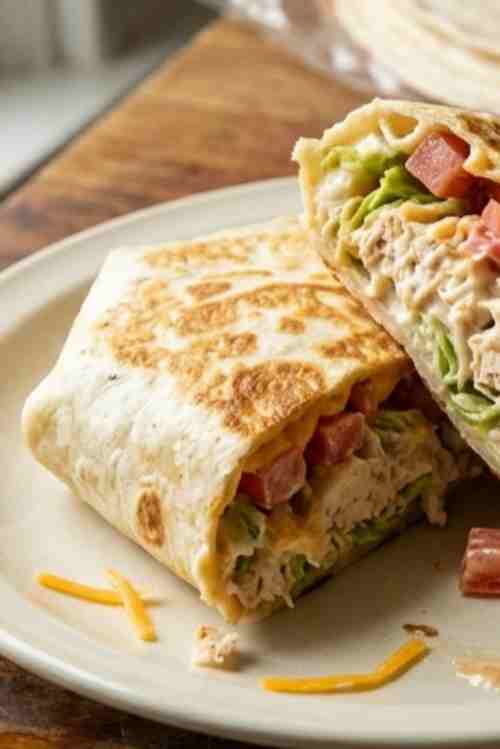
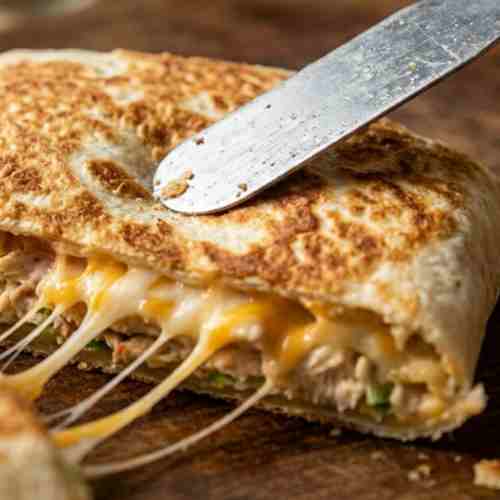
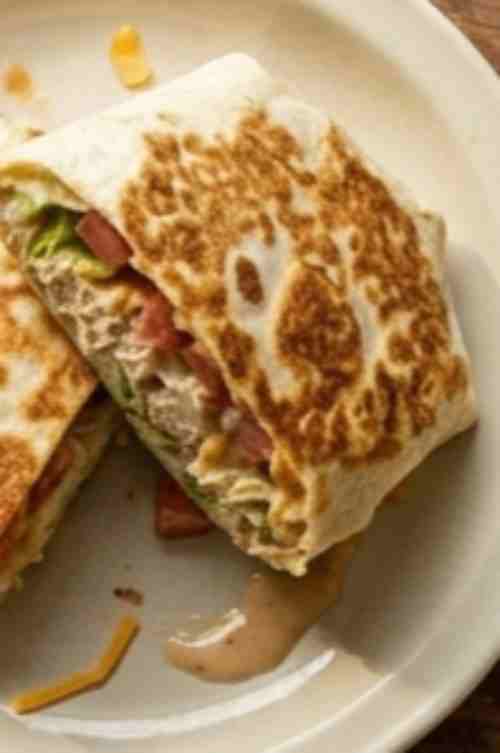
Step 7: Slice and Serve Warm
Remove the wrap from the pan and let it rest for one minute. This helps the filling set slightly so it does not spill out when cutting.
Slice it in half using a sharp knife. Serve immediately while warm, crispy, and cheesy.
Tips for the Best Chicken Crunch Wrap
- Do not overfill the tortilla or it will be hard to close
- Always cook seam side down first to lock the wrap
- Use medium heat for even crisping
- Press lightly while cooking for better crunch
- Serve immediately for the best texture
- Warm tortillas before folding to avoid cracking
Variations and Add-Ins
- Spicy chicken crunch wrap with hot sauce or chipotle mayo
- BBQ chicken crunch wrap with smoky barbecue sauce
- Extra cheesy version with double cheddar and mozzarella
- Veggie crunch wrap with corn, peppers, and avocado
- Buffalo chicken crunch wrap with buffalo sauce and ranch
- Breakfast version with scrambled eggs and cheese
What to Serve With Chicken Crunch Wrap
- French fries or potato wedges
- Fresh garden salad with light dressing
- Coleslaw for a crunchy side
- Guacamole and salsa dips
- Iced tea, lemonade, or cold drinks
- Roasted vegetables for a balanced meal
Chicken Crunch Wrap
Ingredients
- 2 cups chicken breast cooked, shredded
- 1/2 cup mayonnaise
- 1/4 cup sour cream
- 1 teaspoon garlic powder
- 1 teaspoon onion powder
- 1/2 teaspoon paprika
- Salt to taste
- Black pepper to taste
- 1 cup cheddar cheese shredded
- 4 large flour tortillas
- 4 tostada shells
- 1 cup lettuce shredded
- 1/2 cup tomatoes diced
- 1/2 cup nacho cheese sauce
- 1 tablespoon butter or oil
Instructions
- In a bowl, mix shredded chicken with mayonnaise, sour cream, garlic powder, onion powder, paprika, salt, and black pepper until creamy and well coated.
- Warm flour tortillas slightly so they become soft and flexible.
- Place one tortilla on a flat surface and add the creamy chicken mixture in the center.
- Top with shredded cheddar cheese, lettuce, tomatoes, and nacho cheese sauce.
- Place a tostada shell or crispy tortilla round on top of the filling.
- Fold the tortilla edges inward carefully to fully seal the wrap.
- Heat butter or oil in a pan and cook the wrap seam side down first.
- Cook for 2 to 3 minutes per side until golden brown and crispy.
- Remove, rest for one minute, slice, and serve warm.
Notes
- This chicken crunch wrap is best served fresh right after cooking for maximum crispiness.
- Do not let the wrap sit too long after frying, or the tortilla may soften.
- The tostada layer is essential for the signature crunch texture, so do not skip it unless needed.
- Keep fillings centered on the tortilla to make folding easier and prevent tearing.
- Warm tortillas slightly before assembling to avoid cracking while folding.
This chicken crunch wrap recipe is simple, crispy, and full of rich flavor. It combines creamy chicken, fresh vegetables, melted cheese, and a crunchy tostada layer inside a golden tortilla wrap.
It is easy enough for busy days but still feels special and satisfying. Once you make it at home, it can easily become a regular favorite for lunch or dinner.